Fern Pteris cretica

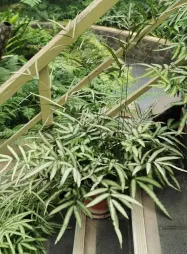
Cut fronds of Pteris from Crete

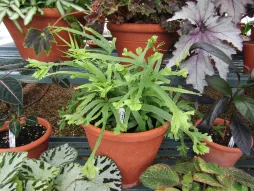
Frond of Pteris cretica

Spores on the underside of a Pteris cretica frond
Contents
Find all our tips in the Monstera application


Pteris cretica, a fern (almost) as old as the hills
Contents
Find all our tips in the Monstera application
Scientific classification
Family
Pteridaceae
Type
Pteris
Species
Pteris of Crete - Pteris cretica
Other names:Pycnodoria cretica, Pteris cretica var. cretica, Pteris pentaphylla, Pteris serraria, Pteris treacheriana, Pteris trifoliata
Ferns are like the dinosaurs of plants. Pteris cretica, for example, has existed since the Tertiary era, 65 million years ago. Today, this member of the Pteridaceae family can be found in every corner of the globe, from the Canary Islands to Ethiopia, via Yemen, Japan and Madagascar.
How to recognize the Pteris cretica fern?
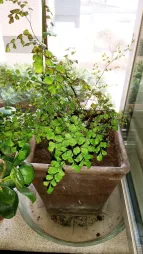
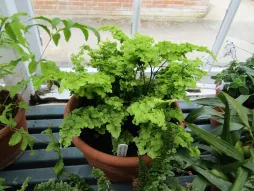
Pteris cretica is a fern with a dense, splayed habit. It can measure up to 60 centimetres in all directions. Indoors, it's an evergreen perennial. In the wild, however, the leaves fall off in winter. Only the rhizome remains. This technique enables Pteris de Crete to survive the bad weather.
Fronds grow in clumps from a short, creeping rhizome covered with scales. They have a long, slender stipe (up to 30 centimetres), the base of which is also protected by scales.
Arched fronds measure up to 30 centimetres long and 20 centimetres wide. They are divided into two to seven linear, lanceolate segments. The color of the pinnules depends on the variety. In the botanical Pteris cretica, they are dark green. But there are also ferns with light green or variegated foliage, such as Pteris cretica 'Mayii'.
Sterile and fertile fronds appear on different plants. The former can be recognized by their serrated edges. The latter have a rolled margin. In summer, they bear sori on their underside.
According to the American Society for the Prevention of Cruelty to Animals, Pteris cretica is non-toxic to dogs, cats and humans. Some even claim it has medicinal properties.
Our maintenance tips
The Pteris of Crete like subdued light and humidity. If you install them in a bathroom with a window, these plants are very easy to grow. Elsewhere, you'll need to make some effort to provide them with sufficient humidity.
 Watering
The substrate must always remain moist, but the plant must not have its feet in water. Remove stagnant water from the saucer or planter to prevent root rot.
Water the soil with non-calcareous water at room temperature. Use rainwater or, if you don't have any, demineralized water.
 Spray
Spray
Mist foliage to increase humidity and repel pests. Always spray with rainwater. Tap water is too hard and leaves white marks on the leaves.
 Repotting
In spring, transfer your Pteris cretica to a larger pot, so that it can continue to grow.
Get a perforated pot. You can add gravel or clay balls to the bottom to improve drainage.
The Pteris of Crete need rich soil. Mix equal parts heather and perlite. You can also combine 50% potting soil for green plants and 50% leaf compost. Pour on a layer of substrate.
Plant your Pteris of Crete in the center and fill in with soil. Be careful not to bury it too deeply! The rhizomes should be flush with the surface. Water generously to facilitate rooting.
You can place your pot on a dish filled with moist clay balls. The evaporation of water helps to increase humidity.
 Fertilization
You can stimulate the development of your plant during its growth phase, in spring and summer, with fertilizer.
Fertilize with a green plant fertilizer to stimulate growth. Your Pteris of Crete is not very greedy. Divide the dose prescribed by the manufacturer by two to avoid damaging its foliage and roots.
 Prune
Prune
To encourage the growth of your Pteris of Crete, prune regularly.
Remove dry fronds with clean, sharp pruning shears.
 Plantation
Once the last spring frosts have passed, you can plant.
Choose a bright location, but away from direct sunlight. In the hottest hours, the strongest rays can burn the foliage of your Pteris of Crete.
Soak the root ball of your plant to rehydrate it and promote recovery.
all the Pteris of Crete plants have shallow roots, but their rhizomes tend to spread out. To help your plant flourish, dig a hole wider than it is deep. Place a layer of compost or leaf compost at the bottom.
all the Pteris of Crete plants have shallow roots, but their rhizomes tend to spread out. To help your plant flourish, dig a hole wider than it is deep. Place a layer of compost or leaf compost at the bottom.
Plant your specimen in the center. Fill the hole with a mixture of garden soil and heather. Don't bury your Pteris of Crete too deeply! The rhizomes should be flush with the surface. You can use the remaining garden soil to form a watering trough.
Water generously to facilitate rooting.
Water generously to facilitate rooting.
 Cutting
Cutting is carried out during the strong growth phase, generally in spring and early summer.
Take advantage of repotting to multiply the plant by dividing it. Once you've dug up your Pteris cretica, locate a rhizome with aerial stems and several fronds. Separate it from the main plant using your hands or a clean, sharp knife.
Prepare a ten-centimeter diameter pierced pot. Fill it with an equal mixture of potting soil for green plants and leaf compost.
Plant your cutting in the center. Don't bury it too deeply. Its rhizomes should be barely covered by soil.
Water generously to encourage rooting and remove air bubbles.
Disease / Threat
Information
| Lifecycle | Perennial |
| Foliage | Semi-evergreen |
| Exposures | |
| Substrats | |
| Planting methods |
Open ground In pots Planter |
| Categories | |
| Tag |
Soiffarde |
| Origins |
South Africa East Africa Central Asia South Asia East Asia Southeast Asia Southern Europe Western Europe |
| Hardiness (USDA) | 9a (-6.7°C ≤ T° < -3.9°C) |
| Leaf color |
|
Discover plants from the same family
Pteris cretica 'Mayii
Discover
Pteris albolineata
Discover
Venus hair capillary
Discover
Raddi's capillary
Discover